Protective Shoeing,
What it is, and how it can protect your horse from lameness
by Graeme Burt, D.W.C.F, farrier.
In the five years since this was written, considerable advances in materials mean that I no longer use Gripfill as a protective material.
I have now developed the means of using portably injected thermoplastics, which have several advantages over Gripfill. They are entirely safe, and used in modern medicine, together with being used as childrens modelling materials. They are tougher and more resilient, have a very fast curing time, can be easily moulded during curing, and have a very similar shore hardness to the horn which means they can also widen the weight bearing area, reducing stresses on any one point and creating a vastly improved concussion ability.
So while I have left this page up, it is very much an illustration of the Protective technique, the modern materials are a vast improvement on those pictured here in their use.
So how is Protective Shoeing done, and how is it different?
Largely, it isnt. All of the usual principles apply to protective shoeing that apply to ordinary shoeing. Balance is still regarded as very important, as is supporting all of the structures in exactly the same way as all farriers are trained to do.
Breakover positioning and hoof mapping are all the same, although balances are considerably easier to maintain with protective shoeing, as deformation of the hoof throughout the shoeing period is minimal. The only differences are in the length of time required to perform protective shoeing, the materials, equipment and some of the protection worn by the farrier is different.
There are however some considerable advantages over conventional method, the most obvious of which is a very real improvement in the quality of the horn, a very real reduction in deterioration of the feet over the shoeing period, and horses shod in this way very often experience a real improvement in confidence in their ability.
Up until the use of more modern materials, I used to recommend that horses were not turned out for a minimum of one hour after the horse was shod. This was to allow the protective material to properly cure especially during cold wet winter conditions. Horses turned out into muddy conditions were faced with mud displacing the protective material before it had hardened, rendering the protection ineffective. Likewise I used to recommend against overnight summer turnout which weakened the bonds between the protective material and the hoof, allowing moisture ingress.
Thankfully I can announce that with the advent of the new materials I am now using to protect the horses, there is no need anymore to keep horses in at all following the shoeing, as the new materials are not only better, they also cure in a much reduced period, normally inside the time it takes to put the shoes on.
In respect of overnight turnout in the summer, the new materials also offer the ability to adjust the levels of protection to suit the conditions - so as long as I am kept informed as regards when your horse is going out overnight, I can adjust the strengh of the protection to suit, and overnight turnout will not cause a problem.
In horses with particularly poor quality horn that does not support their weight easily, or field conditions are particularly poor, Protective Shoeing is often better performed using acrylic glues as the basis for protection, especially during the Winter months. These glues have the added advantage that they spread weight loads over wider distributions as well as performing very well at stopping moisture ingress, and they also cure very rapidly.
Many farriers may well think it would be impossible to remove shoes with such glues beneath them, but I can assure you that I have done it as easily as in any normal shoeing many times. Remember, horn growth is stronger using protective methods, and that as the horn grows, it will then begin to create gaps and natural degradation beneath, as it would in the wild. This means that by the end of any shoeing period, the hoof growth is stronger, but it is also quite ready to have the protective layer and the shoes removed together.
One of the criticisms I have encountered of the protective method is that it is claimed feet have to 'breathe', and sealing them prevents this. My response is simple - we have to breathe as well, but it is very hard to breathe properly when both your nose and mouth are full of festering mud, and what you breathe in under these conditions will not tend to do you very much good. It would be fine if the feet were in perfectly dry conditions constantly for them to breathe in the air as unshod feet do; but as I have shown, shod feet do not do this, they are forced to breathe contaminated moisture.
SO HOW IS PROTECTIVE SHOEING DONE?
One of the most important aspects to Protective Shoeing is that the only time the feet can be properly rid of external moisture, as those feet that are unshod do, is during the time when the shoes are off the feet, as this is the only time that proper aeration and drying of the base of the wall can be achieved before sealing. Unshod feet aerate constantly, but shod feet cannot.
It is therefore important that the facilities where shoeing takes place are clean, dry, flat and level, so that external moisture levels can fall as much as possible in that all important area at the base of the wall. The best conditions allow air to circulate around the feet during the shoeing, and it is always better to hot fit if the horse will allow, as this will really help evaporation of external moisture from the base of the foot, by warming and hardening the surface.
Damp ground is to be completely avoided, including wet covered concrete yards, as the moment the horse puts his foot down without a shoe on, the base of the foot is moisturised again, defeating the principle. If it is raining, clear a stable of bedding and give it a chance to dry out before shoeing. It is better to arrange another appointment to shoe at a later time than allow the feet to pick up moisture from the shoeing floor, as this will affect his feet adversely during the entire shoeing period, and can go beyond it too if the feet pick up infection as a result.
As with most shoeing, it is best if the horse can be observed in movement before shoeing takes place. This can easily be done as the horse approaches the shoeing bay, but also make a point of asking the owner before shoeing starts if all is well. Dont forget, the owner is with the horse constantly, unlike farriers - they are only with the horse for an average of one hour every six weeks, and can only make a judgement that suits at that time.
As with any normal shoeing, remove the shoes and asess the balances carefully. Pay special attention when trimming to the thorough removal and cleaning of all infected 'crumbly' horn. This is full of moisture and it also conducts it into the foot. If it is not removed it will encourage rapid fresh infection.
Be especially vigilant about cleaning and excavating if necessary all infected areas of the white line. This includes all horn that is crumbly and also excavating all blackened infected horn from the area within the white line right back to the heels. I cannot stress enough how important it is to do this. Many is the time I have seen farriers balance the feet very carefully, observe the horse moving, made shoes up carefully that fitted the feet perfectly - and then compromised their good work by nailing them solidly over a white line that is blackened with badly infected horn.
All wings and expanded flares should be removed. The feet should grow down in a straight line from coronary band to the ground, all round its circumference. If wings or flares are left they will encourage the wall to expand and stretch the white line outwards allowing mud and infection in more easily.
You may well notice that if the feet are quite wet and soft at the start of shoeing, drying of the horn and hot fitting will harden it. You can often actually feel this while working. This gives the horn far greater strength, weight carrying capacity, and durability. As a result the balances you apply during this shoeing will be maintained by this horn which is stronger. All that needs doing now is to protect it from weakening again.
Once the shoes are fitted and the feet really clean and dry you can begin the protection process prior to nailing. If you are going to use acrylics, because of the speed with which they cure, it is a good idea to just go around the horse first with the shoes to check the fit. If there are any small alterations, or the shoes have contracted during quenching, this is the time for minor adjustments. If you are concerned about limiting free movement of the heels, or not being able to remove the shoes afterwards - which I can assure is not a problem - but if you are concerned about it, putting some adhesive tape or oil on the foot surface of the shoe will completely solve this, however I have not found it necessary.
I have spent the last few years researching the best materials available to perform Protection, with mixed results. The reason for the mixed results, as I have now concluded, is that the conditions encountered by the feet are so variable throughout the year, and even from yard to yard, and different feet have such different capabilities, that a wide range of materials are useful to this task, so I will demonstrate how I perform Protective Shoeing with one of the more common ones I use, namely Gripfill.
A lot of farriers may at this point think I have lost my mind, using something that is a general adhesive in use in the building trade. I might remind them that both builders and engineers use hammers, nails, and iron as well, as do doctors in various forms, and also it is now not so uncommon for farriers to use plastics and silicones in their work. Gripfill is actually quite a good material to use for this purpose. It is a safe bonding adhesive that is waterproof, adheres quite readily to both the shoe and the horn, and more importantly, it dries to a flexible plasticated form, facilitating movement of the foot.
Gripfill is a material which I have used with significantly good protective results as when it dries it forms a tough inert pad beneath the shoe which prevents mud from entering and also marries perfectly all the surfaces it encounters moulding itself to the shape of any gap before hardening. Its drawbacks are the length of time it takes to cure - in excess of two hours minimum, so I find it adequate for Summer use, but in Winter a faster curing adhesive is needed.
There are also various horse silicones available, and adhesives which are fast curing. The ideal cure time for this work is between 15 and 30 minutes.
There are other sealing materials as well which can be applied directly to the sole beneath the shoe before protection, such as Adhere Supershine. I find this is a lasting and easy to apply sealer, although a filler is needed as well to prevent mud from getting under the shoes. I will show a shoeing now, where Adhere and Gripfill were used together.
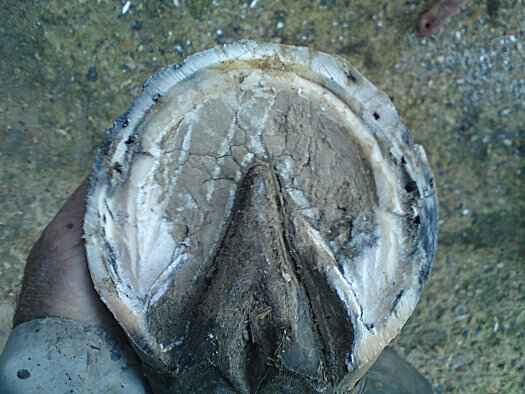 Here is a foot that has been rough trimmed, and the white line areas cleaned, so there is little blackening or crumbly infected horn left. Note the crumbly and discoloured horn has been excavated fromm around the heels. When feet have been protected before as this one has, there is generally not nearly as much cleaning necessary, and as you can see, there is a great deal of very healthy horn left on this foot, The few bits of debris you see are from the foot's last contact with the ground, and they can easily be removed before protection using a wire brush. |
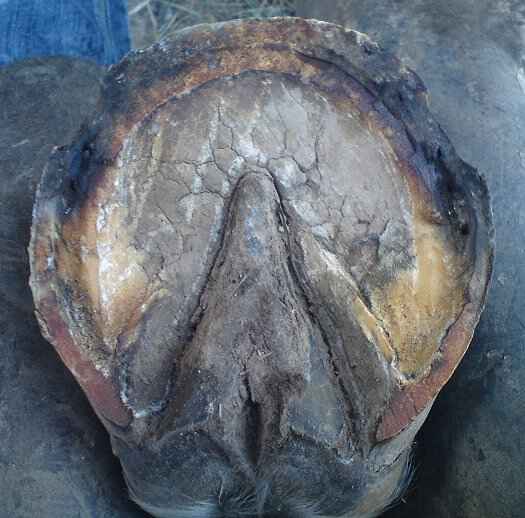 Here is the same foot, once the shoe has been burned on. The surface here is now harder and more resilient because any moisture has now evaporated - this will be a very hard place for any bacteria to exist now, and its ready for sealing so it stays that way while healthy horn grows for the next shoeing without being attacked. |
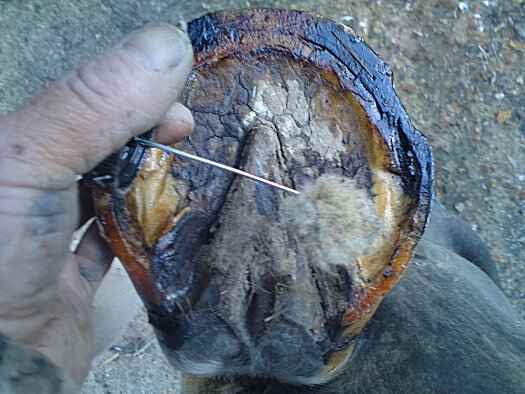 Following brushing, the sealer is applied. I find this one excellent as it is very liquid, and will penetrate and seal the base of the tubules near the white line, and any other little access points moisture can enter. It also evaporates in a few seconds, allowing the filler to be applied straight away afterwards. If the filler does eventually break down over time, as it will, the sealer provides another line of defence. |
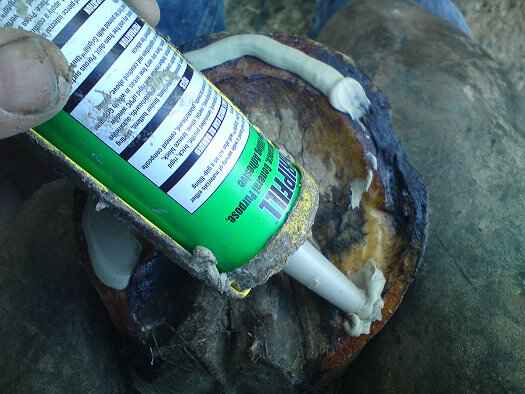 Then applying the filler. It is surprising how much can be needed, as this shows, and I did not waste any. This goes to show just how much mud and dirt can be present in the gaps under a shod foot! The heels are easily the places that hold the most, and they are also the places where most mud gets in, consequently the worst damage happens at the heels. The next photo shows the shoe applied over - and none of the filler squeezes out, showing there is plenty of space there for it to occupy. |
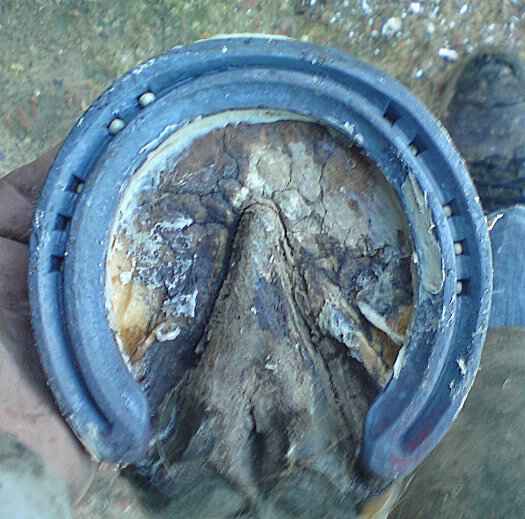 This shows the same foot, with the shoe in place, but not nailed yet. Note that it takes time for the filler to go off, and in that time it perfectly moulds itself into the space it occupies, so in effect, not only does it prevent mud entering, it forms a protective flexible pad as well. Note looking at the picture directly above, how much wider the shoe is than the wall, especially at the heels. All of this gap will fill with mud if protection is not used, and it is impossible to clean it out once it is in there, so it will fester and feed bacteria as it warms up. |
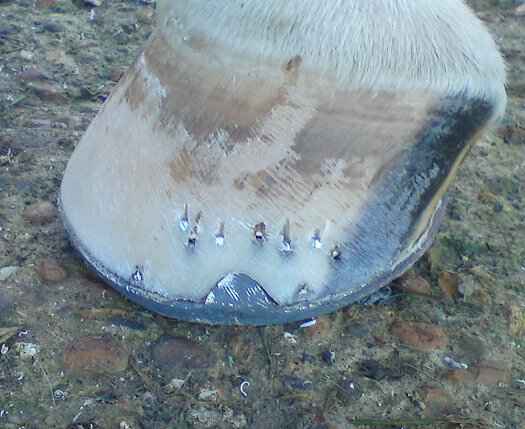 Here is the same foot, following nailing. For this series of pictures, I wanted to deliberately use a horse with light coloured feet. The reason for this is that I can show here the lack of discolouration underneath the nails and right down as far as the shoes, which is a direct result of protective shoeing being used. This means there is very little horn infection within the wall, which is often indicated by black areas in the space between the top and bottom of the nails. There is a little discolouration around the old holes, however, and just to protect that against getting any worse, I also fill the nail holes with a little filler, and coat the foot with Supershine as well. |
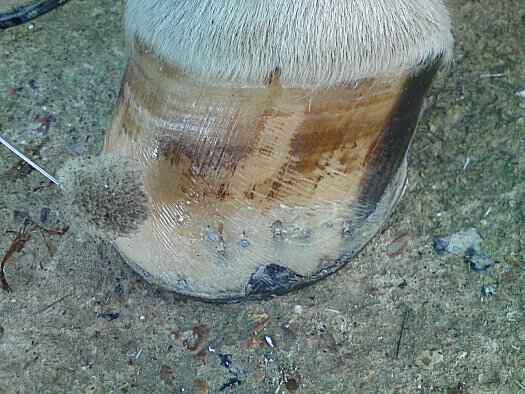 |
Here
is the finished protected foot, which will now resist all attempts for
mud and moisture to enter. All this foot will do now is grow and flex
normally, and until it has grown sufficiently, it will not begin to
deform, buckle, twist, stretch, or break up. This horse is now
guaranteed that he will be able to have the confidence that every time
he works, there will be ample healthy horn on all his feet right to the
bottom to both support and protect him, and that when the feet do grow,
any damage that may occur at the base can be removed at the next
shoeing, leaving him on fresh new healthy undamaged feet again. I began this method of shoeing in 2002, and since that time I have seen a massive improvement in the quality of the feet on all the horses that I shoe. Broken and infected feet are now almost eliminated save for very few horses with particular problems, and flat feet have been virtually eliminated. Stretching toes and collapsing heels are now easily controllable and preventable. This method of shoeing means those horses with shoes on depreciate at a slower rate even than those that are barefoot. |
© Graeme Burt DWCF